
With budget being on everyone’s mind, this DIY Dollar Store Hanger Snowflake is an easy and beautiful decorative addition to your home this holiday season.


Coming in at under $6 to make, all items that you need can be purchased at your local dollar store.
Materials That You Will Need
- 16 white child-size hangers (you can also order them from Amazon, here)
- 1 roll of tape (this is not necessary but it was a sanity saver when keeping everything together)
- 1 package of zip ties
- 1 pair of scissors
- Lights & decorative embellishments (optional)
Directions
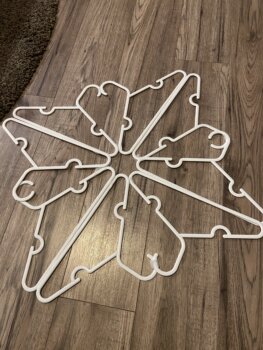

Tape 2 hangers together, making 8 pairs. Make sure the ‘heads’ of the hangers are facing the same direction.
Arrange 4 pairs of hangers and tape them together to make 4 points. Do this twice.
Next, arrange the 2 snowflake shapes on top of each other to make a snowflake with 8 points.
This is when you’re going to zip tie everything together, including all of the areas that you have taped.
Once you are done clip off the excess parts of the zip ties and remove the tape that you used earlier to keep everything together.
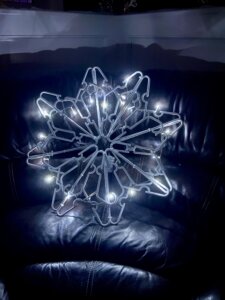
If you are adding lights or decorative embellishments, this is when you can do it. (The zip ties can also come in handy for this!)
Tips For Making Your Dollar Store Hanger Snowflake

Using tape is not necessary, and it adds another step at the end to remove it but it made the process so much easier for me.
At first, I got caught up in overlapping and making everything perfect, but really there are no 2 snowflakes alike, so don’t let this take over.
If you want to add lights, using battery-powered makes it so that you can display your snowflakes anywhere. Make sure you have long strands with lots of lights and make sure they can be used outdoors. Trial and error moments were definitely had in this DIY!
If you live in the Edmonton area, make sure you check out this map of drive-by Christmas light displays.